Want to take better landscape and mountain photos? Here’s how to lift your pictures from average to extraordinary, get that ‘wow’ factor, and really capture the experience of being out there.
Landscape photography has long been important in outdoor-going circles. And since the advent of smartphones and social media, more of us have access to high-quality cameras than ever before.
Sharing photos online has never been so popular. But we’ve all taken shots that, at the time, we’ve thought were amazing; but when we get home, they seem flat or uninteresting.
Many of us can languish as beginner photographers, not quite understanding how great landscape photography comes together to make a ‘wow factor’ photo.
In this guide, Scotland-based landscape photographer James Roddie (check out his win in the Wild Woods category at British Wildlife Photography Awards) comes to our rescue with some essential advice to pack more of a punch with your photography, whether you’re armed with a smartphone, a dedicated higher-end camera, or something inbetween.
Words and photos: James Roddie
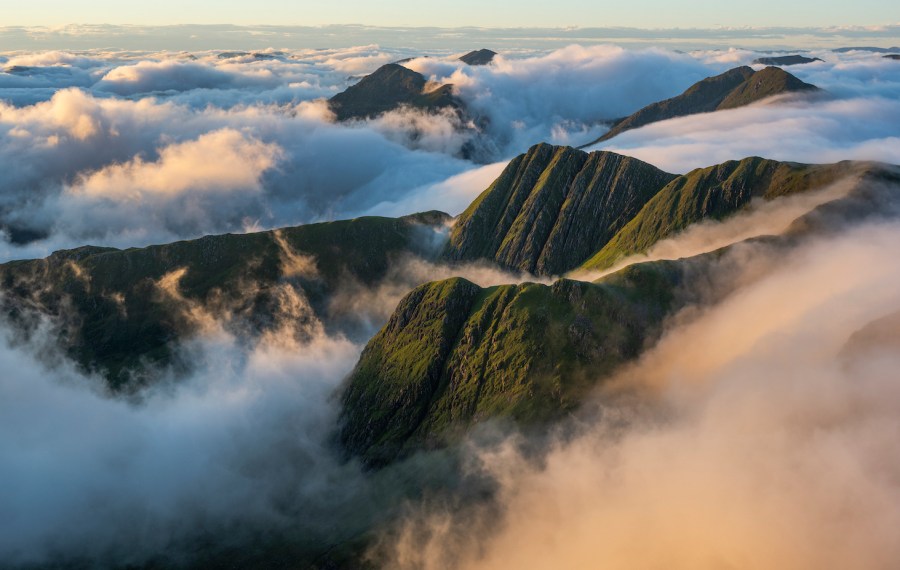
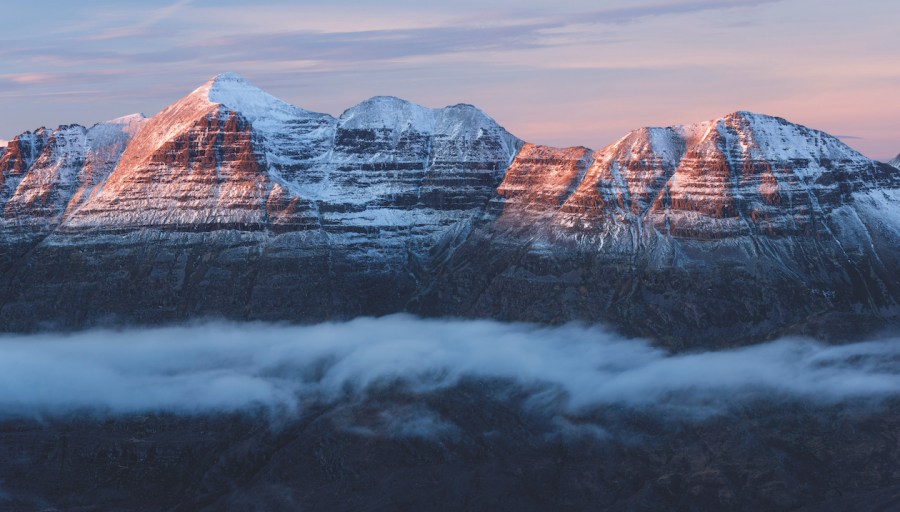
Main image: A cloud inversion over Ladhar Bheinn, Knoydart. Rare conditions like these can make your photos stand out from the many others we see every day. This image was also captured at sunrise – the best conditions are often at the ends of the day.
Guide to landscape photography contents
- Best cameras to use for landscape photography
- Planning and preparation
- The correct settings for landscape photography
- Choosing lenses for mountain photography
- How to take eye catching phone photos
- Outdoor photography equipment list
Best cameras for mountain landscape photography
For beginners
- Apple iPhone is a great way to start out. Whilst you will not be able to print large photos snapped on a smartphone camera, there is a huge amount you can do. Taking photos on your phone is a good way to learn about composition and light before committing to a dedicated camera.
- Nikon Z50 An extremely lightweight but powerful camera, the Z50 has been widely praised for its ability at a relatively affordable price. This is an ideal choice for people aiming to get more serious about photography.
For enthusiasts
- Sony A6600 – A slightly older camera, but the 24.2 megapixel sensor and rapid autofocus make this a great option for photographers wanting to take their photos to the next level.
- Canon EOS R10 – A fast and versatile camera aimed at enthusiasts. The cropped sensor makes it better suited to wildlife photography, but it is still a powerful tool for landscape.
For professionals
- Nikon Z7 II – Featuring a 45.7 megapixel sensor, a weather-sealed, lightweight body and superb ergonomics, this is a camera that can produce professional-quality landscape images whilst withstanding the harsh conditions of the mountains.
- Canon EOS R5 A camera well-known for its versatility, this is an excellent all-rounder equally suited to landscape and wildlife photography. The 45 megapixel sensor ensures high-quality images, and the accuracy of the autofocus system makes it easier to capture fleeting moments of action.
- Sony A7RIV – Another top-of-the-line, full-frame option, equal in every way to the Canon and Nikon offerings. Want a vintage, filmic look but with a digital workflow? The Sony A7 series cameras are well-known for their third party versatility. Using low-cost adaptors, you can pair the bodies with a vast range of legacy lenses from other brands.
Planning and preparation
Being in the right place at the right time is the cornerstone of good photography. If you only ever walk in the hills during the middle part of the day, when the light is at its least photogenic, you are massively reducing your chances of taking good photos. The best conditions often come at dawn or dusk, and spending as much time as possible in the hills at these times will reward you greatly. Put some effort into researching possible locations. Think back to some of the best views you have seen whilst hill-walking and consider what time of year or conditions might turn that view into a great photo. Using online apps such as The Photographer’s Ephemeris will allow you to see where the sun will rise and set on any day of the year in any location, and this can be great for planning photos.
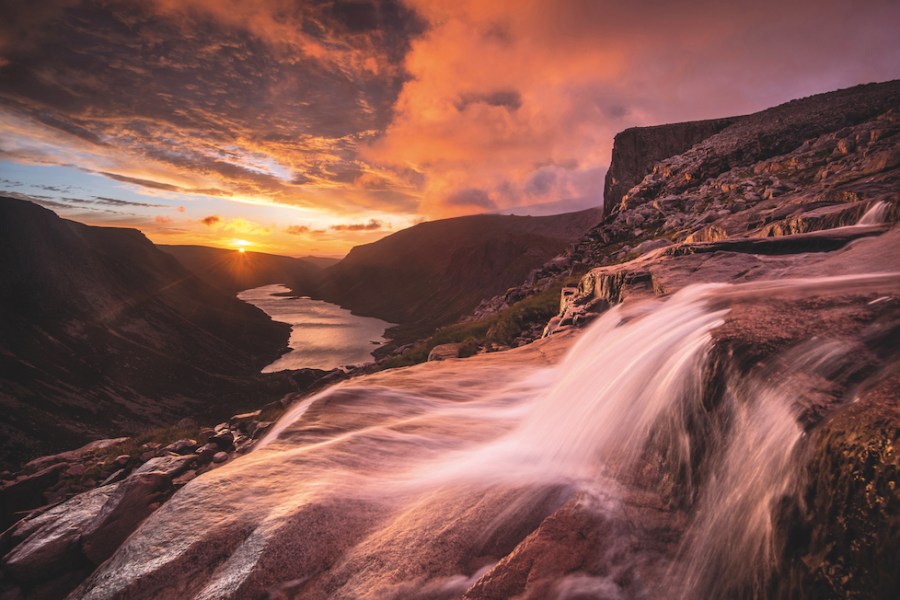
Sunrise above Loch Avon in the Cairngorms. Dramatic light and a prominent foreground like this can help give your images some impact.
Wild camping in the hills can be highly fruitful for photography. It will ensure you are up high during the times of day when the light is often best, so simply put, you won’t miss anything. Set an early alarm, and don’t be tempted by a lie-in! Spend as much time studying weather forecasts and make plans accordingly. If some special conditions are forecast, such as a cloud inversion, try and get out in the hills if you can. The better the hills look when you are there, the easier it will be to take good photos. It is also important to not rule-out days when the weather doesn’t look promising. Changeable weather can produce some incredibly dramatic conditions and light, particularly during periods of Northerly winds and heavy showers. These days can be great for capturing photos whilst you are out walking, as the light is often rapidly changing.
What settings should I use for landscape photography?
Having a degree of manual control over your camera will help you produce better photos. In order to do this, you need to understand exposure. Exposure is the amount of light that reaches your camera sensor.
An over-exposed photo will look too bright and glaring, and an under-exposed photo will be too dark. A correctly exposed photo will look pleasing to the eye, and there will be a balance between the shadows and highlights that you see.
Exposure is controlled by three fundamental camera settings:
1. Shutter speed – This is the amount of time that the camera’s shutter is open and light is exposed on the camera sensor. In low light you will need a long shutter speed, and in bright conditions you will need a fast shutter speed.
Most cameras will allow you to choose any shutter speed from around 30 seconds to 1/4000 sec. Handholding a camera whilst using a slow shutter speed will result in camera blur. As a general rule: if you are handholding your camera, try to use a shutter speed at least as fast as the value of the focal length you are using.
For example, if you are using a 50mm lens, try to use a shutter speed of 1/50 sec or faster. For longer shutter speeds, as mentioned, a tripod will help ensure your photos are sharp.
2. Aperture – This is an adjustable opening in the camera’s lens through which light travels. The wider the aperture, the more light is allowed in. Aperture is measured in f-numbers.
Confusingly, the wider the aperture, the smaller the f-number – so f2 would be a wide aperture. Whereas f16 would be a narrow aperture. Aperture also controls depth of field – the zone within your photo that is in focus.
Using a wide aperture produces a very narrow depth of field, whilst using a narrow aperture produces a very wide depth of field. To take landscape photos that are sharp throughout the image, you would normally choose a mid-range to narrow aperture, usually between f8 and f13.
3. ISO This is the adjustable sensitivity value of your camera sensor. A low ISO value such as 100 will mean the sensor is less sensitive to light, and a high ISO value such as 6400 will mean the sensor is very sensitive.
Using higher ISO values introduces ‘noise’ into your photos, resulting in grainier and less clean-looking photos. So, the lower the ISO value you choose, the higher the image quality will be.
So, how do you choose the correct settings for landscape photography?
For landscape photography, using ‘aperture priority’ mode works well in most situations. This allows you to choose your aperture and ISO value manually. Thecamera will then decide on the appropriate shutter speed.
You can then simply use the exposure compensation dial to make fine adjustments. If the resulting photo looks too bright or dark, and the shutter speed will change accordingly.
Beinn Alligin on a hot summer evening.
For most wide-angle landscape photos, an aperture of between f8 and f13, ISO 100, and a shutter speed chosen by the camera are the go-to settings.
This should produce enough depth of field for photos that are sharp throughout, and clean, grain-free images.
Choosing lenses for mountain landscapes
For mountain landscape photography you don’t want to haul a bag full of heavy lenses around, so it is best to limit it to one or preferably two lenses. A good combination is a wide-angle zoom (such as an 18-55mm lens), and a standard zoom (such as a 24-105mm lens). Wide-angle lenses are used for capturing expansive scenes, usually with close, prominent foregrounds and more distant background interest. Standard lenses are used for capturing photos from a perspective more normal for the human eye.
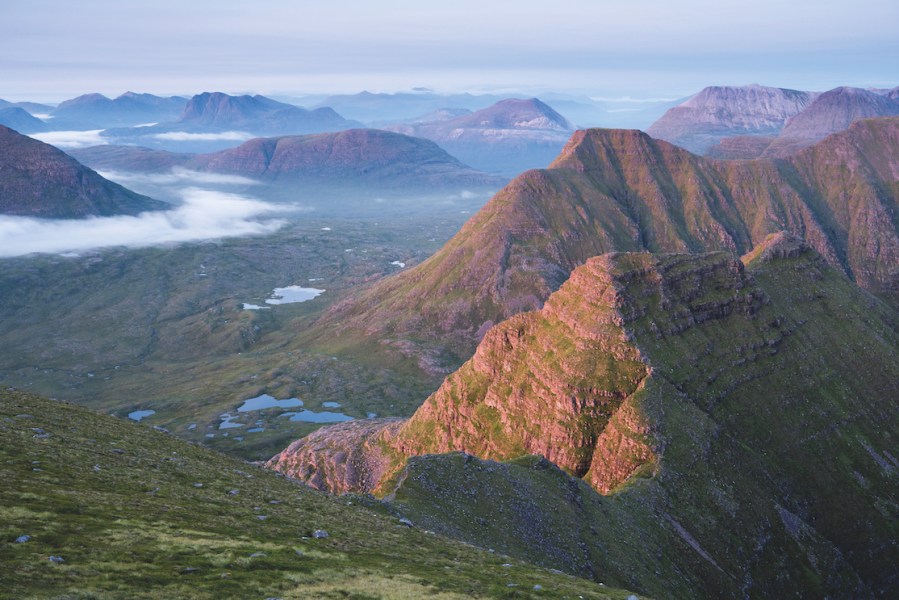
Winter light in Torridon. A telephoto lens can help create a compressed perspective such as this.
If you want to take things further, then a telephoto lens (such as a 55-300mm) will allow you to pick out more distant details in the landscape, such as a lone mountaineer silhouetted on a summit. It can also be used to compress perspective, making distant ridges and summits appear more prominent.
A lightweight tripod is also recommended, as it will help you to take sharp photos in low light. The best light of the day is often around sunrise and sunset, when taking pin-sharp photos handheld can be very challenging.
How to take eye-catching photos with your phone
Many people take photos with social media primarily in mind. To stop folk from just scrolling past, you need your images to be eye-catching. There are a few things you can do to give your shots some serious impact:
- Seek out unusual perspectives on familiar locations. Some places (such as Buachaille Etive Mor in Glen Coe) have been photographed so often that we have arguably become collectively numb to their beauty. If you can find an unusual, or even new, perspective on such a place, whilst still retaining its familiarity, you are sure to create a more arresting image.
- Take photos in the most dramatic light. Sunrises, sunsets, rainbows and misty conditions are almost universally loved in landscape photos. Stormy skies, with a mix of dark clouds and bright bursts of light, can also be brilliant.
- Include a person amongst the landscape. Including a figure, dwarfed by the landscape, can be a great way of introducing some scale to your photos, or even balancing a composition that is missing an extra ‘something’.
- Concentrate your efforts in dramatic or impressive locations. Although gentler, rolling landscapes can be wonderful for photography, images from these places are usually less eye-catching.

Outdoor photography equipment list
Heading out soon and want to know what equipment you should be taking with you when wanting to take some really special outdoor or landscape photographs. Then check out our equipment list below. It has everything you will need for a successful trip into the mountains.
- A camera body. A lightweight body with a full-frame sensor is ideal.
- A wide-angle zoom (e.g. 18-55mm), a standard zoom (e.g. 24-105mm) and – if you have space – a telephoto zoom (e.g. a 55-300mm).
- A lightweight, high-quality tripod.
- A polarising filter. This allows you to reduce reflections from water and add colour saturation to the sky and other elements of the photo.
- A lens cloths. Make sure these are easily accessible, especially if the forecast is bad.
- Spare batteries. You don’t want to run out of power just as the light is at its best.
- A sturdy but lightweight umbrella. This can be useful for shielding your lens from rain or snow during periods of squally weather.