Having the knowledge to improvise a shelter should be in everyone’s repertoire, says Andrew Price of Dryad Bushcraft. Here are his ten tips…
The chances of having to spend an unscheduled night in the woods is reasonably unlikely in the UK if you are well prepared, but being able to build a shelter can be a great adventure at home. Any shelter we use must be aimed at reducing heat loss as much as possible. The factors here are protection from wind and rain, and insulation to maintain our core body temperature. You should make shelters in controlled conditions and with permission of the land owner.
1. Prioritise your efforts
When conditions are dry and cold I prefer to concentrate my efforts on building a good fire and a supply of wood to last through the night. If conditions are wet then building a shelter to stay dry is more important.
2. Start with plenty of time
The decision to start building an emergency shelter must be taken in
good time, ideally a couple of hours before sunset. This will give you plenty of time to prepare your shelter, light a fire and gather fuel for the night.
3. Find natural features
You may not need to do much building if you can find natural features that will offer protection: caves, fallen trees, and rock overhangs can all offer shelter from the elements, and with a bit of modification become comfortable places to spend the night.
4. Create insulation
Protection from the wind and insulation from the ground are essential. Utilise whatever materials you can find to make a bed for the night. When time permits I try to build a raised bed using logs covered with small twigs, and finally a deep layer of dry leaves, grasses, and bracken or spruce boughs.
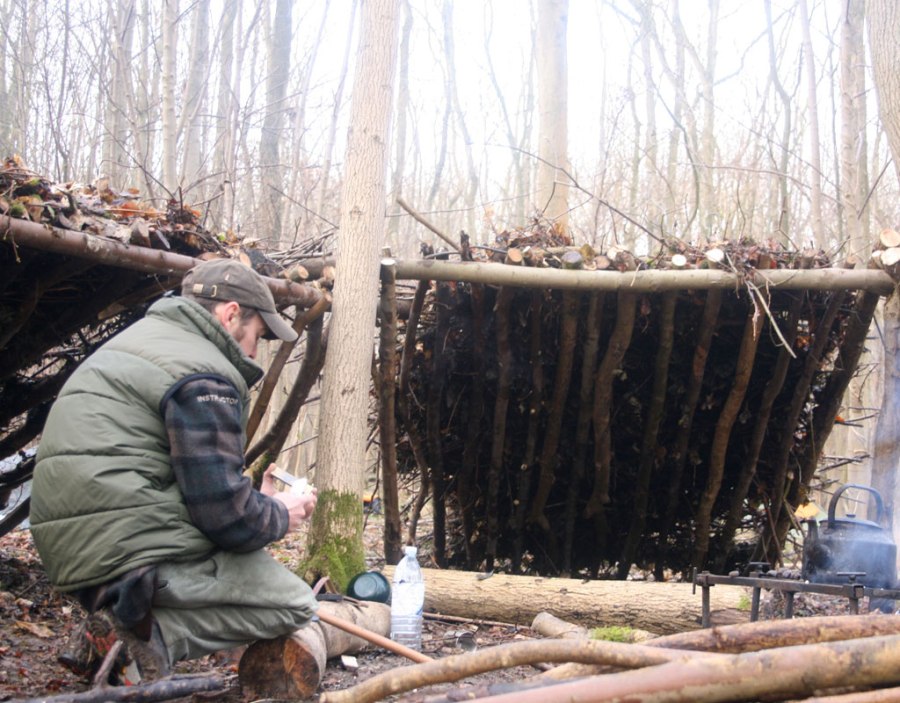
5. Build a lean to
Lean-to shelters are the best options for situations when you can build a fire. Being open fronted allows the heat from the fire to keep you warm. They can be constructed using the support of standing trees, or by cutting Y-shaped supports. Don’t build the shelter too big, it only needs to be big enough to lie in and sit up, any bigger than that and you’re using energy unnecessarily.
6. Keep the roof at an angle
Keep the roof supports at a steep angle to shed water, and aim to cover the entire surface of the roof with whatever materials you can find. Use a leafy branch to rake up piles of dead leaves – you can’t have too much insulation. Dead leaves act as tiny roof tiles which divert drops of rain down and away from the inside of the shelter.
7. Make sure the shelter is sturdy
Using supporting sticks with interlocking forked branches means that you don’t have to use any string or rope to hold the shelter together. The structure should be strong enough to take your weight, the last thing you’ll need is the whole thing collapsing on you in the middle of the night. Make sure that none of the supporting poles stick up through the roofing or they will act as conduits for water to run down and drip onto you.
8. Direct it against the wind
The shelter should be orientated at an angle to the prevailing wind. This protects you from the chilling effects of the wind, and allows smoke from the fire to be blown away from you.
9. Be flexible with design
If you can’t build a fire for any reason, then the debris shelter you build should be enclosed at both sides and with a small doorway which can be blocked with a rucksack, or an improvised screen made from grasses, sheets of bark or spruce boughs. This type of shelter should be completely filled with insulating material, so that you can wriggle inside and hibernate like a hedgehog.
10. Practice in good conditions
As with all bushcraft and survival skills, the time to practice building an emergency shelter is not when you’ve become lost in a blizzard, and have to spend a night out of doors.