Walking in crampons and using an ice axe are crucial skills to grasp when on firm snow and ice. The Great Outdoors takes you through everything you need to know about using them.
First, we hear from Giles Trussell of Glenmore Lodge, about the basics.
To start with, it’s always worth anticipating challenging terrain ahead and walking in crampons before you need them. However, they can be a trip hazard, particularly on bare or rocky ground, so consider your surroundings and make a judgement based on current conditions and what you see before you.
Words: Giles Trussell, Glenmore Lodge and James Roddie | Main image: James Roddie
Walking in Crampons: content guide
- The essentials
- The techniques
- Looking after your spikes
- Walking in crampons on flat snow
- Walking with an ice axe
Walking in Crampons: the essentials
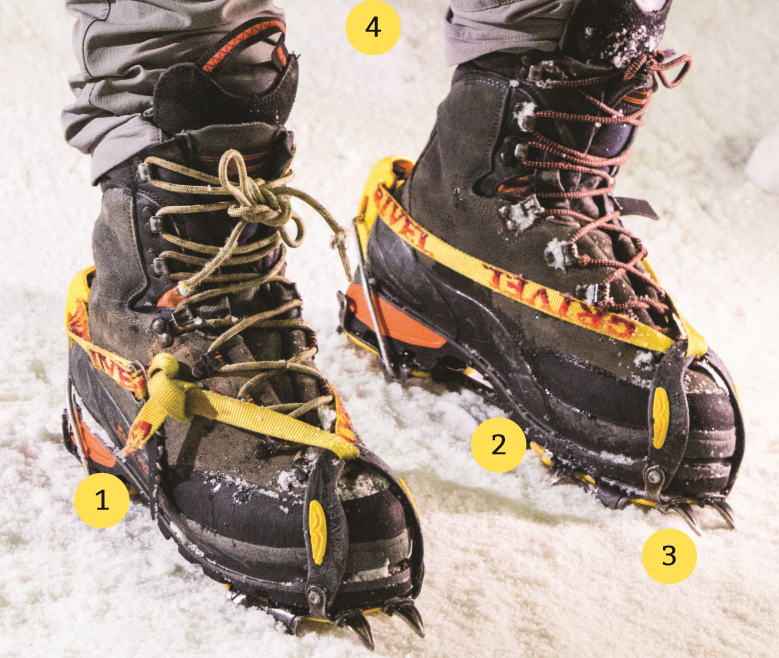
- Ensure your crampons are on the correct feet, buckle on the outside and set correctly to your boot.
- Keep a clean, snag-free instep if possible.
- On most snow, a body weight walk is sufficient for point penetration. On hard icy surfaces, glazed or super hard névé it is often necessary to be more forceful with the foot plant or front point.
- Set your gait slightly wider than normal.
- On any consequential slope, if you have your crampons on you should also have an axe in your hand.
Balled up snow
Balling-up is when snow sticks underneath your crampons, making them less effective. Anti-balling plates are fitted to most crampons but it’s still important to watch out for balling. If it does occur, tap your foot against a rock or, if necessary, with the shaft of your axe.
Walking in crampons: the techniques
Different types of terrain require different approaches. Try to practice all of these in non-critical environments before heading out onto the tops.
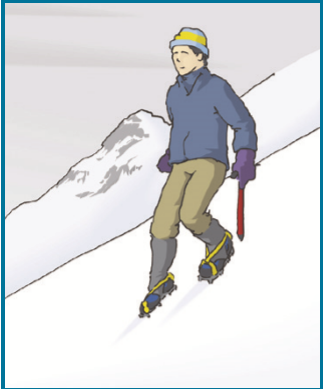
Flat-footing in ascent
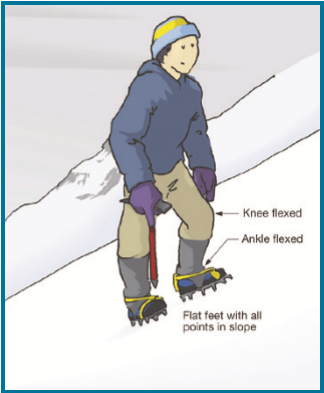
For flat, firm snow or relatively shallow-angled slopes, or to walk up steeper slopes at an angle:
- Be positive and assertive, take control of the surface, and be the boss
- As it says – flat feet, all downward points in contact with the surface
- Across slopes push knees and hips out to maintain point contact. This will relieve stress on your ankles
- Check point print to see if you are managing this
- As the slope steepens, consider pointing feet more downhill to engage the point
- Use an exaggerated swing of the foot/leg as you step over
- Stamp if you need greater penetration
- Remember, rhythm and steady progress is good: axe, stamp, stamp
- Changing direction, put your two feet into a V-shape facing up-slope, or consider stamping around facing down the slope
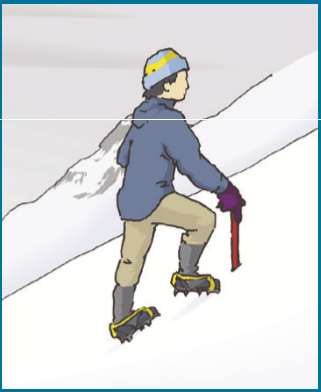
Front pointing in ascent
- Swing from the knee, and let the boot weight do the work
- Maintain a relaxed knee, with feet horizontal
- Ensure a direct kick perpendicular to the slope, engaging all front points
- Take small upward steps, with a wider stance for stability
- Remember rhythm: axe, kick, kick
Front pointing in descent
- Small steps down
- Feet wider for increased stability
- Remember rhythm: axe, kick, kick
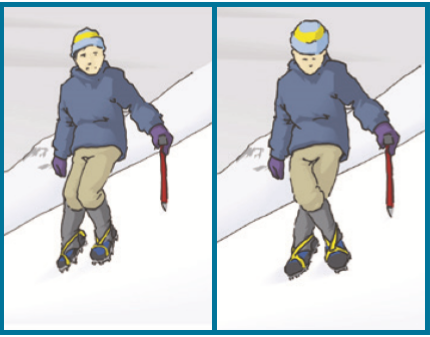
Flat footing in descent
- Lower hips to keep weight centred over crampons
- Positive deliberate stamp
- Create a steady rhythm to your movement
Top Tip: If the snowpack allows, it is also OK to heel-plunge in descent with crampons on. Remain tuned into the environment as you may need to change back to a fl at-foot technique if things firm up.
Traversing
- Front point facing in or flat foot facing out
- Remember rhythm, engage the axe for stability
The hybrid or combo in ascent – front point and flat foot
This is a great energy- and speed-efficient technique for boots or with crampons.
- Axe in the same hand as the front point
- The leading leg kicks in as in pigeon steps or front pointing
- The trailing leg flat edges or flat-foots
Looking after your spikes
Crampons take a lot of weight over the course of a day, so it’s worth keeping an eye out for cracks around adjustment points and holes or bends. Check yours out at the start of the winter and regularly through the season.
After each day out, dry them off. And when the end of the winter comes, make sure to clean them and lightly lubricate them. Store them without rubber protectors to avoid rusting. If the points on your crampons have blunted, you can sharpen them with a hand file. You may also occasionally have to tighten the screws and tidy up any frayed straps. Loose threads can be melted off with a lighter.
Carry an emergency repair kit with you in case you need to repair your crampons on the go: a long strap and buckle, spare rivets, nuts, bolts and screws, thin wire, cable types, tape, a screwdriver, Allan keys, and light pliers.
Now, James Roddie shares his expert advice on adding ice axes into your winter movement repertoire, as well as a few extra tips for walking in crampons for beginners.
Walking in crampons on flat snow
Don’t wait until you are on steep snow to put crampons on. Find a flat area where you can fit your crampons without risking a slip. The first few minutes of walking in crampons can feel odd, as you now have a bunch of metal spikes on your boots. Tripping over your own feet, tearing clothing, or skin, are now additional hazards worth considering, meaning you must adapt the way you walk. On flat snow, keep your feet pointing forwards and shoulder-width apart. This prevents you from catching your crampons on your other boot or trouser leg.
As you take each step, ensure the soles of the crampons are parallel to the surface of the snow, so that all the bottom points engage at once – this is called flat footing. Take deliberate steps, lifting each foot high enough so you don’t trip on the snow as you move.
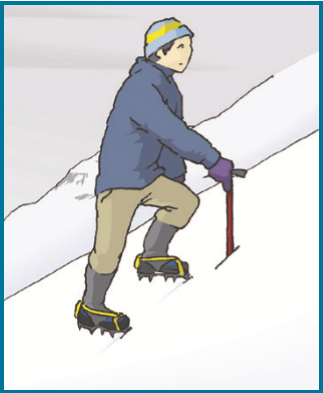
Walking with an ice axe
Along with walking in crampons, learning to use an ice axe is key to negotiating snow slopes safely. You should have your axe easily accessible throughout a winter hill day. If you are walking on a snow slope, then take it off your pack and carry it. When walking with an ice axe, you should hold it by the head with the pick facing backwards and the adze facing forwards. Wrap your thumb around the base of the adze, line your index finger down the shaft, and wrap your other fingers under the pick. This will ensure a firm grip and enable you to get the axe into self-arrest position if needed, very quickly.
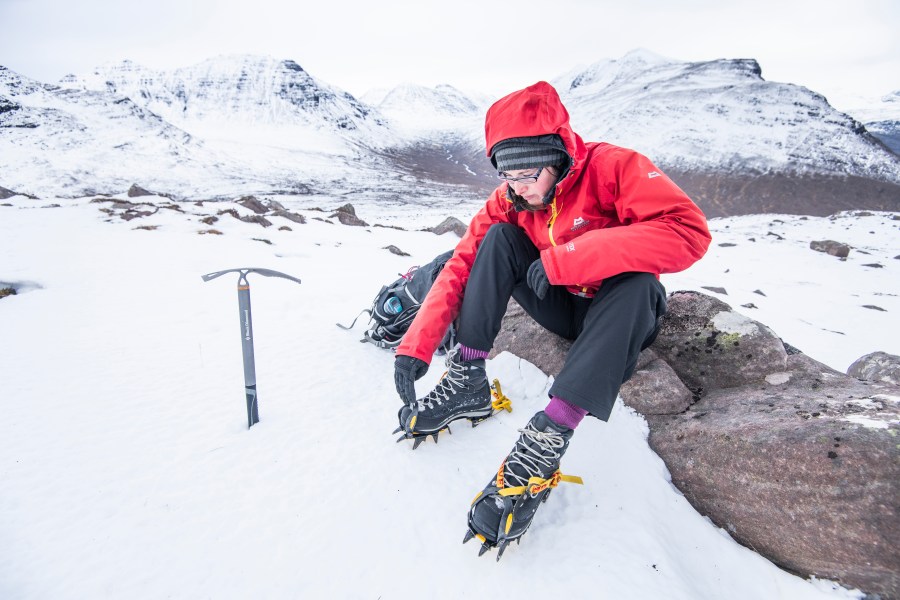
You should put your crampons on atop a flat surface to avoid slips.
Credit: James Roddie
Make sure that you always hold the axe in your ‘uphill hand’ – this ensures the greatest amount of support. If you are zigzagging on a slope, swap the axe between hands with every change of direction. If you are front pointing directly up or down, then you will not have an ‘uphill hand’, so most people will use their strongest or dominant arm. Whether moving uphill or downhill, plunge the axe spike (at the bottom of the shaft) firmly into the snow between steps. This provides a third point of contact with the slope, helping to prevent any slips.
It is common to have to negotiate small areas of snow where putting on crampons may be overkill. In this situation, an axe can be used for support as you kick steps in the snow with your boots or be used to directly cut steps in the snow if it is icy. If you’re cutting steps, it is wise to attach a wrist leash to the axe, to avoid dropping it mid-swing.
Learning to self-arrest is an essential skill for preventing a slip from turning into something more serious. However, it is a last resort, and slips should always be avoided. Attend a winter skills course led by a qualified mountaineering instructor to learn how to self-arrest effectively.
If you’re in the market for a set of crampons, check out our Buyer’s Guide to crampons, including jargon-buster.