Giles Trussell from National Outdoor Training Centre Glenmore Lodge, gives advice based on the Avalanche Information Service’s “Be Avalanche Aware” guidelines
There are three important stages in your approach to avalanche safety: planning (usually done at home); the journey (which begins when you walk out of your accommodation); and key places (identified locations on your journey where it is a good place to consider the next leg). Within these three stages are a further three factors to consider:
✱ Weather and snow conditions/forecasts
✱ You and your party’s skills, experience and equipment
✱ The landscape and terrain you will be travelling through
Stage 1: Planning
- Consider weather forecasts from at least two sources – the best for the UK are generally the Mountain Weather Information Service and the Met Office. Both sites are found as links on the Scottish Avalanche Information Service website from which you will also need the avalanche hazard forecast for the
next day. - Carefully assess the skills of everyone in the party. Ensure you have good winter skills that mean you are comfortable navigating in poor visibility and, if necessary, can negotiate firm snow or icy conditions with axe and crampons.
- If using a guidebook, always use maps at the same time to see if the book’s route suggestion is practical in the forecast conditions. Some guidebooks are very much biased to summer conditions. For example ‘The window’ in Creag Meagaidh is a ‘trade route’ access point preceded by a terrain trap and there are a couple of places on the track that have seen large avalanches sweep across. There are alternative, safer routes to the summit.
- Study carefully your journey and identify where there are any Key Places where you may need to watch out for significant changing terrain and snow conditions or where navigation may be more challenging and the need to walk accurately on a bearing more critical. Also consider whether your planned escape or alternative routes are free of avalanche hazard.
Stage 2: The Journey
- Remain tuned in as you depart to your destination. Make constant observations. Observe if the weather is as forecast. Particularly note freezing level, wind strength and wind direction and precipitation amounts, along with how much transport of snow is occurring.
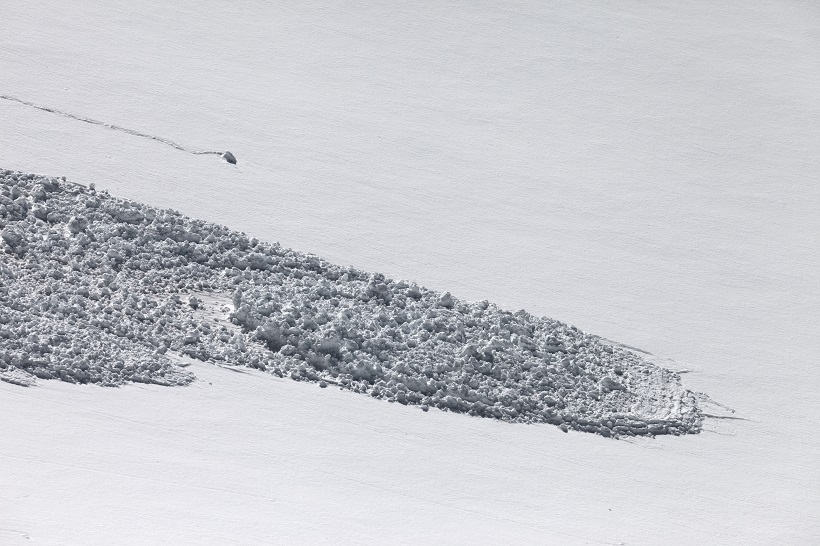
- There can often be obvious signs of snow transportation, such as raised footprints and airborne particles, even though snow may not be falling. Try and predict what effect this will be having on the snow pack. Is the snow as you expected?
- Some simple probing of the snow, or digging a trench to examine the layers, can give you more information about the top part of the snow pack. When doing these samples, look for evidence of stability and of instabilities or potential weak layers. Be vigilant about the slope aspects and altitudes on which these instabilities could be significant.
- Repeat these observations along your journey as you gain height. Note similarities or changes. Build the bank of information. If visibility allows note what you see higher up. Can you see higher up? Can you see your intended route ahead? Look particularly for any signs of avalanche activity – even old debris can give a clue to what could be possible. Slopes of 30-45°, terrain convexities, cornices and terrain traps may all present an increased hazard. Consider whether they present a hazard to you.
- If you and your party are making the progress predicted at the planning stage, it is likely the planning was appropriate. However it is still necessary to ensure everyone is properly equipped to negotiate firmer surfaces and that navigation is on track and situational awareness is being maintained.
Stage 3: Key Places
- Another way to think about Key Places is to see them as safety waypoints. These key places could be at near the foot of steeper ascent, at the top of descents, before entering more complex terrain and at key navigation points. At these locations, the visibility of the route ahead is a key element in aiding decision-making.
- It is normal that at these Key Places you should already have a clear idea of what your options are, having spent time on the journey gathering information about the avalanche hazard. Consolidate your field observations. Look at your terrain options ahead of these key places . Listen to everyone’s views.
- It may be useful to appoint a ‘Devil’s Advocate’ to check and challenge decisions. If at any stage there is uncertainty about safety then it is likely that you should seek an alternative. If there is doubt there is no doubt – avoid relying on luck and guesswork. Better to go for the safer options. But if the weather forecast, your planning and navigation has been appropriate and accurate you shouldn’t need to alter your plans.
- After your successful day out it is useful to review and consider the next day taking into consideration any observations and learning from your day.
The SAIS “Be Avalanche Aware” guidelines can be found here.
Glenmore Lodge runs three levels of Avalanche Awareness training courses. Check out glenmorelodge.org.uk for more information.