Ryan Simpson of Horizon Expeditions explains the options when choosing crampons, and how to use them
There are few sights more impressive than a mountain shrouded in a winter coat, few experiences more inspiring than standing atop a summit looking out at a majestic winter landscape. Winter mountaineering is an immensely rewarding, yet challenging activity. In winter conditions, the simplest of tasks take on a new sense of urgency and seriousness. When everything (including you!) is coated in snow and ice, when the wind is pushing you in directions that you don’t want to go and when you cannot see more than 10 feet in any direction, your reliance on your basic mountain skills is absolute. In winter, shorter daylight hours, challenging weather, demanding walking and difficult navigation conspire against us to form greater challenges that those we encounter in summer. However, greater rewards can also be found in winter. On those few, exceptional days when everything comes together, when the weather and conditions are fine, when we get up and out early, we can find an experience that is truly unforgettable.
How to choose crampons
It is a good idea to look at your boots and crampons as one system, rather than two totally separate pieces of equipment. It’s therefore important to match them together properly. Crampons and boots are rated in such a way that we can match them together for our intended purpose. Boot ratings consist of B0, B1, B2 and B3. The rating is used to describe how flexible a boot is, or how much support it provides. As a rule, the higher you go, the more rigid the boot. B0 is generally a flexible boot, best suited for summer walking, whereas B3 is a very rigid boot, designed for ice climbing and mountaineering. Due to nature of these boots, you’ll usually find that the higher up the scale you go, the warmer the boots become too.
Crampons also have a rating system. This is very similar, and consists of C1, C2 and C3. This rating refers to the flexibility of the crampon, and also how it attaches to the boot. C1 crampons are usually flexible with simple straps and usually ten points, C2 are usually articulated with heel clip with 12-14 points, and C3 are often completely rigid with heel clip and toe-bail.
As a general rule, a B1-C1 setup is suitable only for low level walks in winter, and is not sufficient for winter mountaineering. A B2-C2 setup is the most common for winter mountaineering, with a B3-C3 generally being used for winter climbing. It is important to note that a higher rated boot can take a lower rated crampon, for example B3-C2 (a common combination when a warmer boot is needed, but a technical climbing crampon is not). But they cannot be matched the other way round. When buying crampons it is imperative that you make sure they fit your boots. Not all crampons fit all boots. Ensure that you take your boots with you to the shop when buying crampons, and try them for size. They should fit fairly centrally on the sole of the boot, with none of the crampon sticking out the sides of the boot. They should also fit solidly, with no “wobble”.
How to walk in crampons
Crampons, as with any pointy thing, can be a hazard. Always remember that you are wearing them and be cautious. You need to adopt a “John Wayne” walking style, with your feet wider apart to ensure that you do not catch your crampons on the opposite trouser leg. A LOT of serious accidents have happened as a result of this.
A few techniques
Flat footing (French technique) As it sounds, walk with your feet flat on the surface, with all the downward facing points pushed in. Ensure that your points are engaged. On slopes, it can be uncomfortable to walk straight up with this technique. You could zig zag across the slope, with your feet pointing in the direction of travel. As the slope steepens, this becomes more difficult and you will inevitably have to point your feet further downhill. It is important with this technique to use all of the downward facing points, as you will become unstable if not. On even steeper slopes, use your ice axe as a “third leg”. The principle being that two legs must be solid before you move the third.
Front-pointing
Again, the clue is in the name. Front pointing involves using the front-facing points of our crampons. This is the normal way to climb steep snow or ice, and is very tiring on the calves. The two front points, and usually the two secondary front points are kicked into the slope for support. When using this technique, it is imperative that you keep your foot horizontal. If your heel is too high, or too low, you can lever the front points out of the slope. Use your ice axe as a “third leg” as above.
Hybrid
This is where the upper foot is front pointing, and the lower foot is flat footing (pointing across the slope, or slightly diagonal). The axe is used for support. This allows for some rest for the lower foot. Swapping the role of each foot can help with this. Your choice of the above techniques will depend on the angle of the slope. In descent, I suggest that you use an easy angled slope that you can flat foot down. If you were to negotiate a steeper section using front pointing, make sure that you are using your axe for support, and that you are ensuring that it is biting solidly.
How to fit crampons
All crampons are different. Here I am going to show you how to fit a standard B2-C2 crampon correctly. You should only have to do the first two steps once.
1. Line the boot up with the crampon to get an idea of whether the crampon is too big or too small.
2. Adjust the length of the crampon on the centre bar. The crampon should fit snugly. The heel should not overhang and as much of the front points should protrude as possible.
NOTE: ALWAYS put on your crampons while standing up. Don’t sit down to do it. This leads to loosely or incorrectly fastened crampons that fall off when you least want them to!
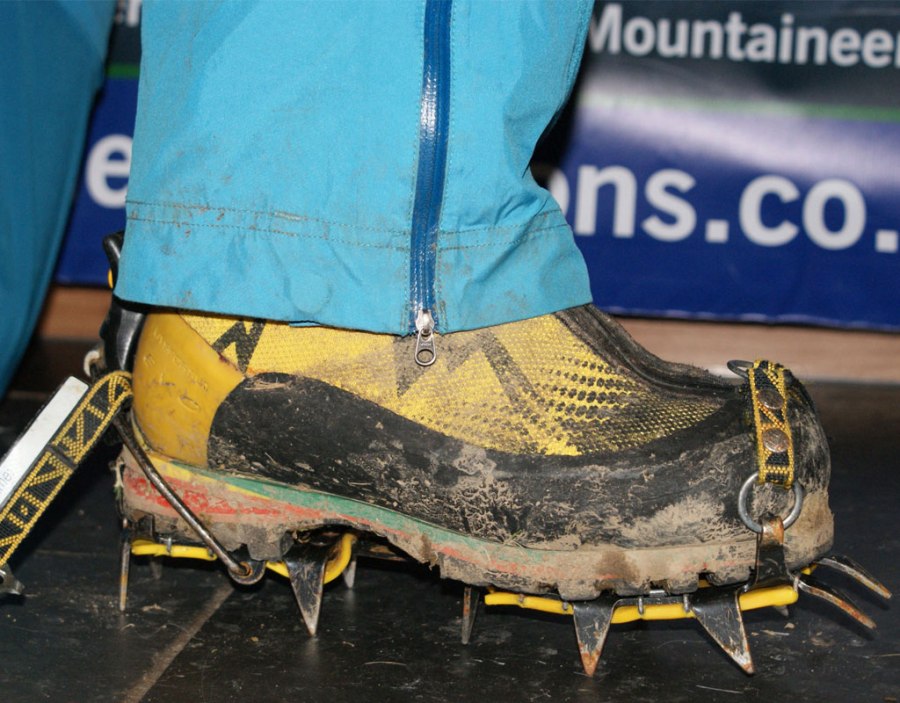
3. Fit the boot into the toe bail and then adjust the heel bail so that when you click it into place you get a nice firm click. This may need to be adjusted via a screw on the bail. The bail should sit in the plastic groove on the back of the boot.
4. Now fasten the straps. Pass the strap through the hole in the toe bail, and round to the buckle on the outside of the boot. These commonly consist of two rings – pass the strap up through both and down through one. Crampons differ, so ensure that you have followed the instructions that come with them.
5. If the crampons are new, you may need to trim the strap to prevent it from becoming a trip hazard. Don’t chop it too short! Remember you will probably be putting these on while wearing gloves and you may need to attach them to gaiters.